Hi there! I have here the simple registration form implemented, and depending on the form validation result, I'd love to show the flash message at the top of the page, indicating if account creation was successful or not.
Rendering flash messages is not hard at all in Hanami 2, and when you visit the official getting started guides, you'll see exactly an example of how to do it in a very straightforward way.
Rendering flash messages
The easiest way to show flash messages in your app is like this so let me start by copying the code from the official guides to a new partial, named: flash_msg. I already have the session enabled so I'll skip this step.
However, because in this series I am working with Bulma CSS framework, I'll add some HTML sugar on top of it, so the actual rendering will be pretty out of the box, so you'll more likely subscribe to the future content I produce.
# main/slice/templates/layouts/_flash_msg.html.erb
<% if flash[:notice] %>
<div class="notification is-success">
  <button class="delete"></button>
  <%= flash[:notice] %>
</div>
<% end %>

<% if flash[:alert] %>
<div class="notification is-danger">
  <button class="delete"></button>
  <%= flash[:alert] %>
</div>
<% end %>
Then in the layout, I can render this partial with no problems at all.
<div class="container">
  <%= render :flash_msg %>
  <%= yield %>
</div>
Setting flash messages
Now, this won't show anything yet, because the flash is nowhere to be set yet, so let me visit the action file to create a new registration and write down the form validation for each field.
It requires the registration root object, which is a hash containing multiple fields, all of them being required, and the type of string.
The only exception will be the TAC field, which refers to terms and conditions, which is a checkbox and should be always resolved to truthy value.
# slices/main/actions/registrations/create.rb

params do
  required(:registration).hash do
    required(:username).filled(:string)
    required(:password).filled(:string)
    required(:password_confirmation).filled(:string)
    required(:tac).filled(:bool, eql?: true)
  end
end
Having that, In the handle method I can check if the form parameters are valid or not, and setup the flash message accordingly. Later in this place we'll place the error rendering logic but I'll leave a comment for now only.
def handle(request, response)
  if request.params.valid?
    response.flash[:notice] = "Account successfully registered!"
    response.redirect(routes.path(:root))
  else
    response.flash[:alert] = "Error occured while creating the account"
    # here will be validation error rendering logic
  end
end
Also, for the successful request processing, I'll redirect to the root of my application, and for the failure I'll do nothing, which by default will render the :new view again with the create action context set.
Let me check now what will happen when I test it out.
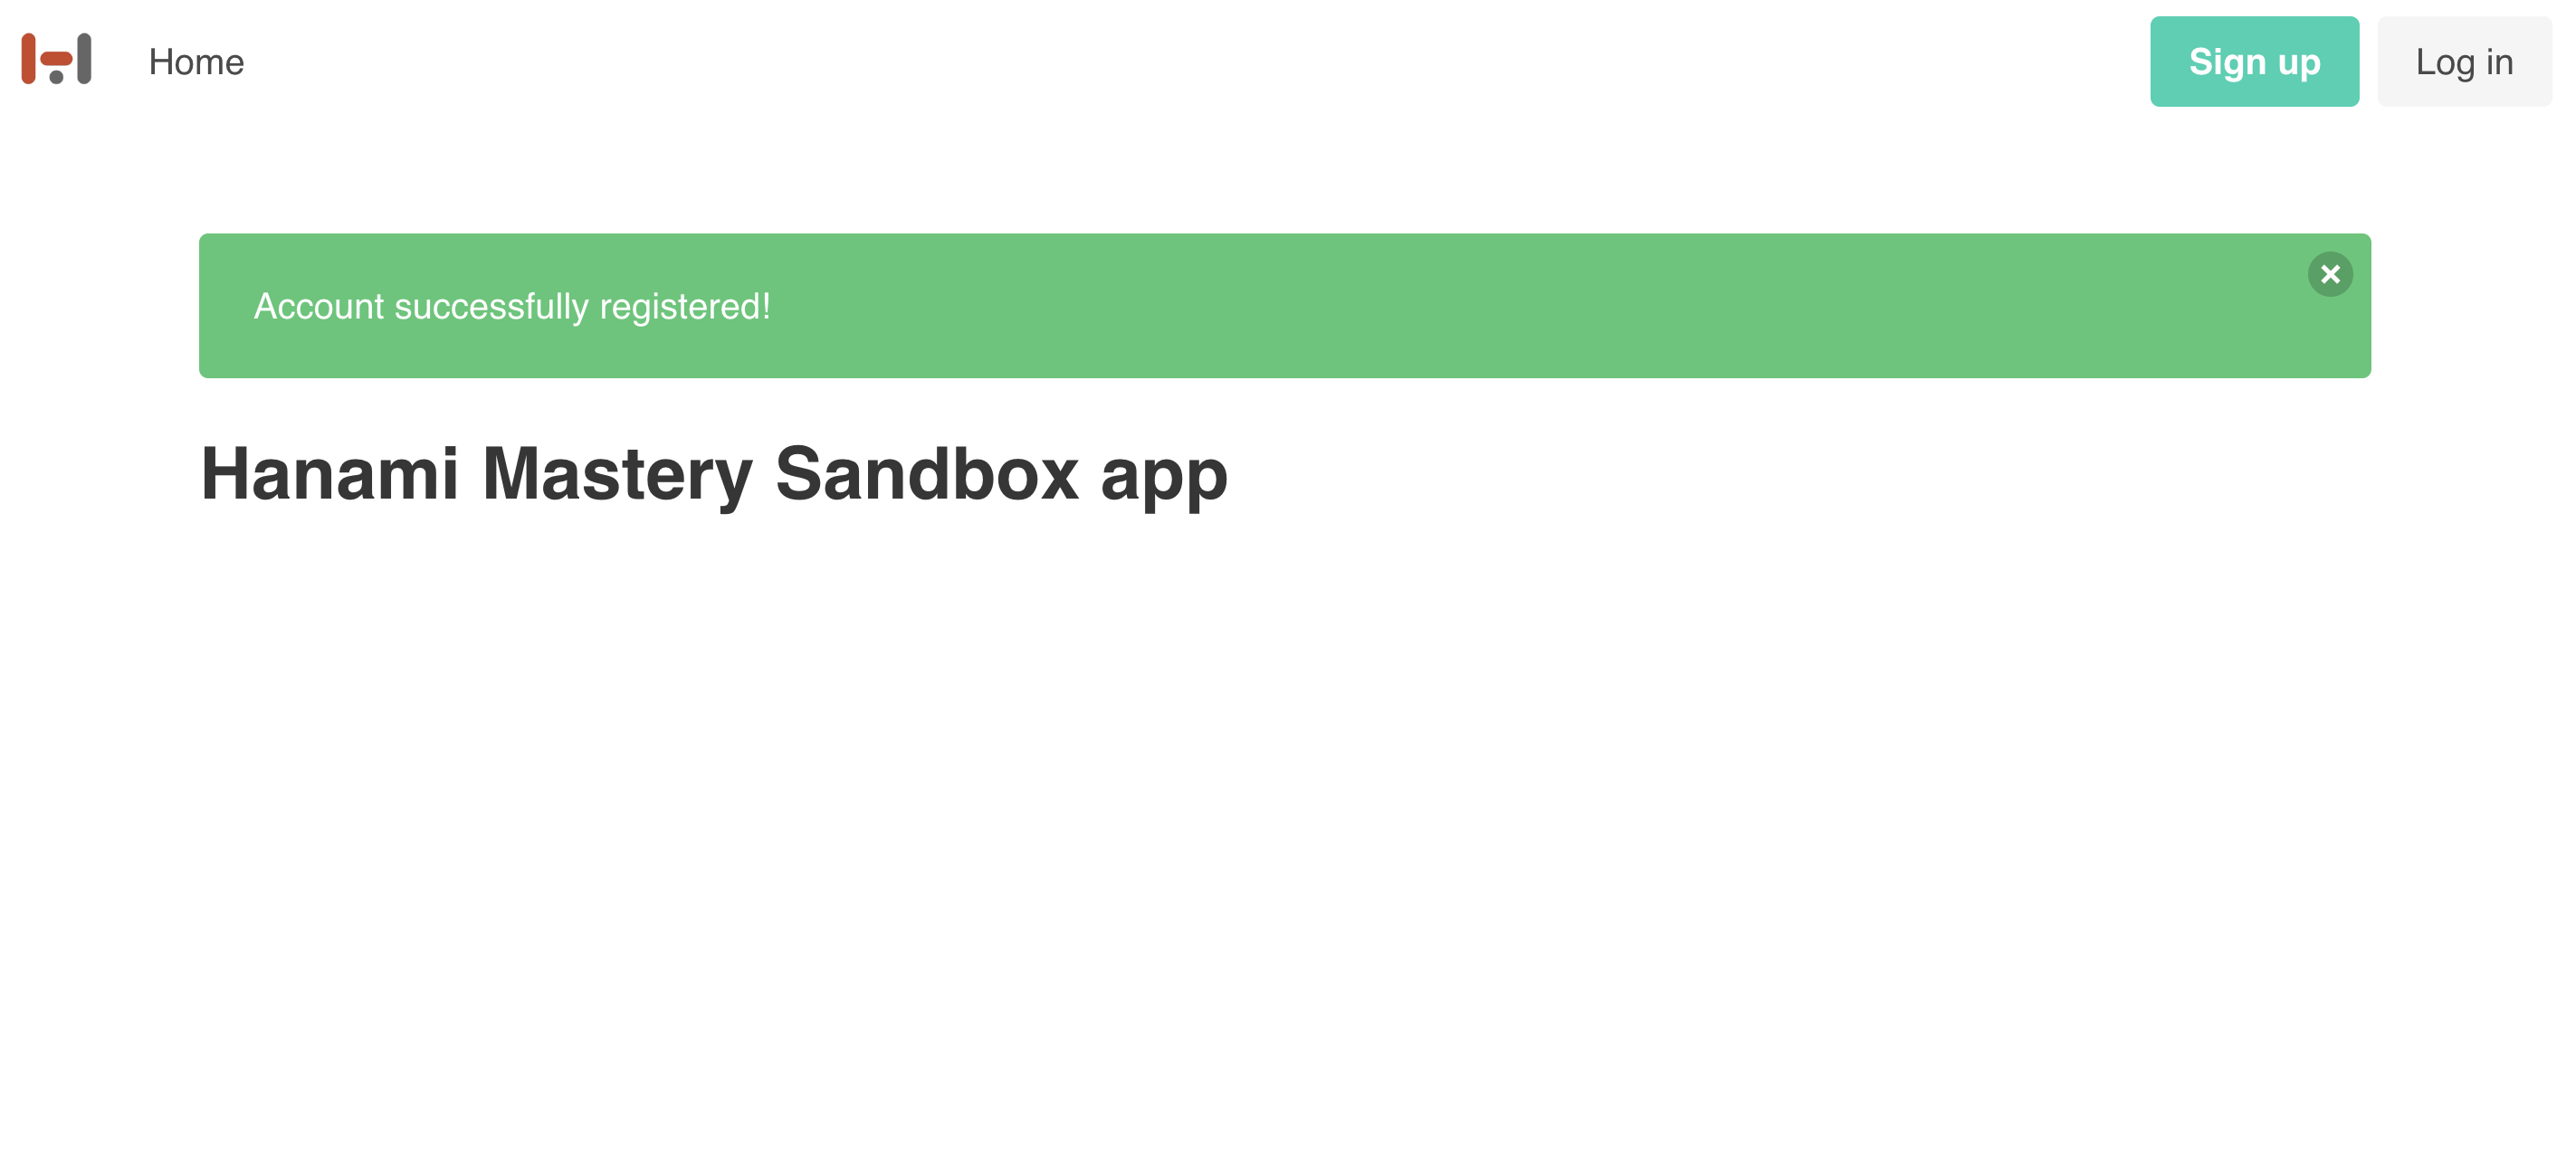 Successful flash message
You can see that validation errors are flashed out properly, but with some troubles on the way:
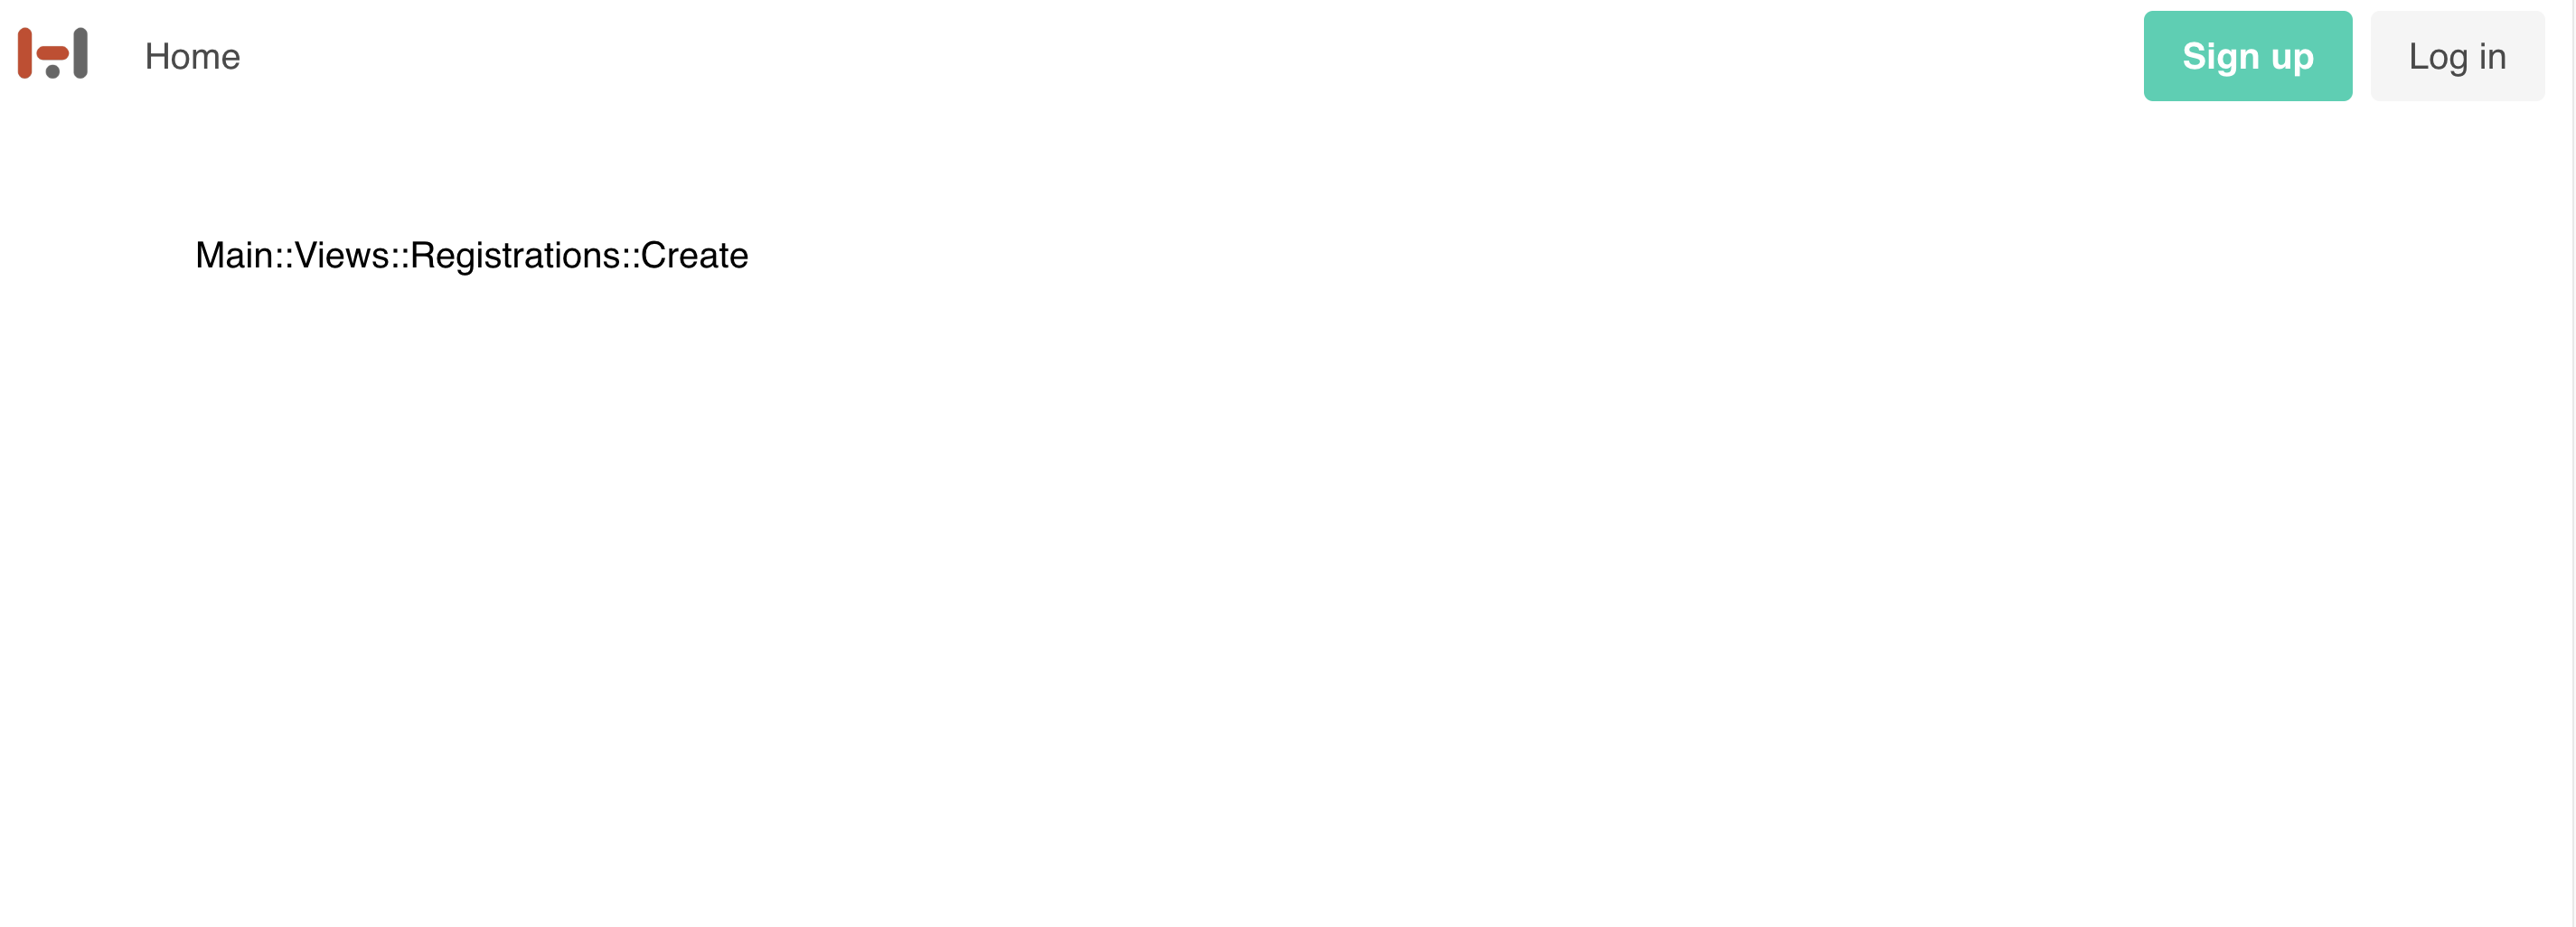 Missing flash message example
When the form is successful, everything seems to work as expected, but to render the error flash message, it requires a page refresh to notice that the flash is set.
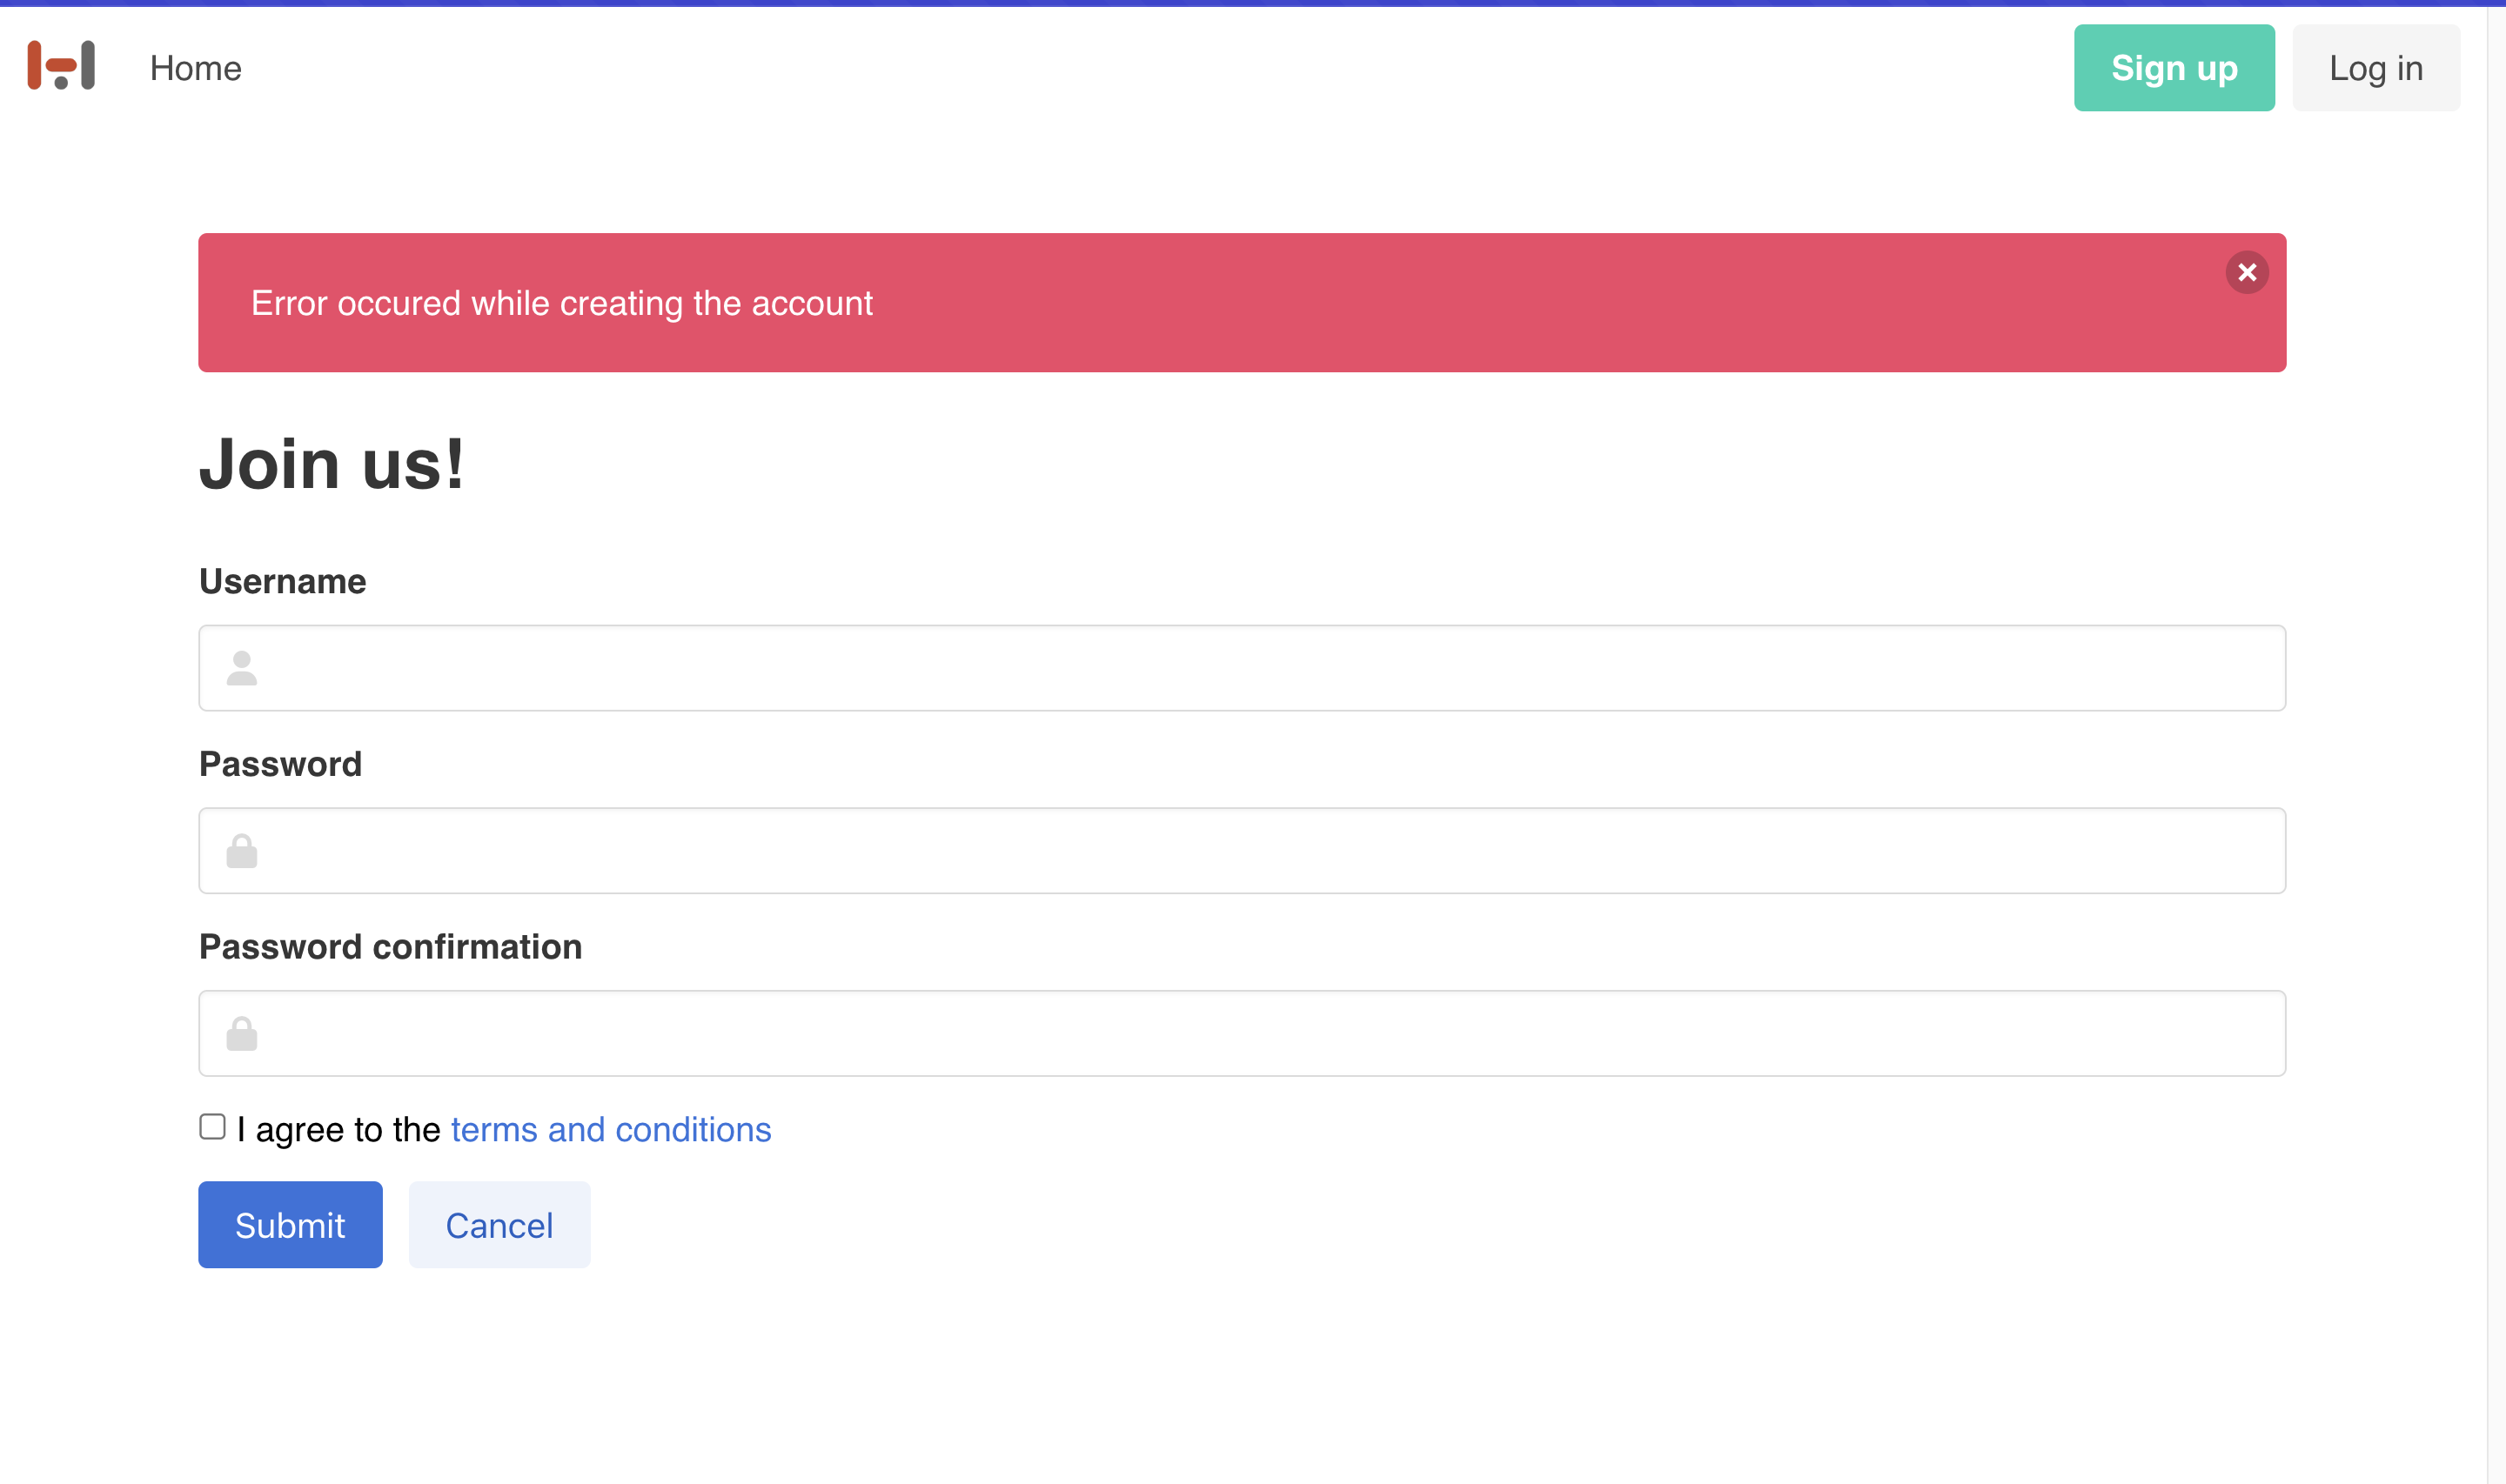 Error flash message
This happens because flash messages by default are only set for the context used for serving the next request. This makes it work for redirects, but if I want to render the view in the current action processing, I need to explicitly say, that the flash message should be set now
# ...
else
  response.flash.now[:alert] = "Error occured while creating the account"
  # here will be validation error rendering logic
end
Now our messages are shown well and that's an absolutely fine approach, however, Hanami provides you with tooling to write this in a more fancy way.
Extracting the logic with custom helpers
In the templates, there should be no logic. If you work with Rails, that's a very common thing you probably heard multiple times, but Rails does not provide you with any way to extract this logic out of templates, and you need to come up with solutions on your own if you want to keep your apps maintainable.
:::tip Phlex logic extraction Recently I recorded an episode about Phlex and what I really like in that approach is that you can write your templates in pure ruby, having ruby objects extracted out as you would do for anything else, and this logic extraction seems pretty natural for me. :::
Another approach could be to use view-components which is quite popular in the Rails community and I can cover this up at some point if there is an interest for it
However, hanami also gives you the power to extract the logic, and for that on top of templates, it gives you:
- View - a ruby class that fetches and prepares the data to render, as well as decides which template to use to render it. It passes down the prepared data to the template by
exposures. - Part - a ruby class that allows you to additionally decorate each exposure your view fetched from the system or got from the action.
- Scope - a ruby class that allows you to render the same partial, but with local variables prepared and calculated based on the given context.
- Helper - a simple, widely accessible method that allow you to call the correct stuff easier without polluting your helpers too much.
Here is how it will look in the real-world example.
Simplifying the partial
The first step would be to extract any logic that leaked to my template.
Disclaimer
Ok, It's not the actual first step. For the very first step, you should have a feature test created for flash messages, which as usual I'll skip on this tutorial but just for you to remember, I am absolutely and totally into making sure you have automatic test coverage before starting any kind of refactoring.
For now, though, there is a big if condition here in my partial, and there are two differences below. First is where I want to set the div class based on notification type and the second is where I want to render this notification type from the flash hash.
First of all, let's replace the flash rendering lines with just a simple message call. Next, let's remove the notification-specific class and replace that with the notification_class variable.
This way both rendering branches become exactly the same. Now I can get rid of the whole conditional and render the template only if this block should be visible.
<div class="notification <%= notification_class %>">
  <button class="delete"></button>
  <%= message %>
</div>
That looks nice, but I need to resolve all those variables now somewhere, and for that, I'll use the helper first.
Creating the custom view helper in Hanami 2
In the app layout I want to replace the partial rendering with the helper method call, let's say flash_message
# slices/main/templates/layouts/app.html.erb

<%= flash_message %>
Now let's define this helper by creating a new Helpers module and adding this new method inside. I can access the flash from helpers using the _context object. and at the end, I'll need to render the correct partial with all the locals resolved.
module Main
  module Views
    module Helpers
      def flash_message
        flash = _context.flash

        # TODO: resolve variables here

        render(
          'layouts/flash_msg',
          message: message,
          notification_class: notification_class,
        )
      end
    end
  end
end
Now let me quickly resolve the logic to render the flash correctly. I want to decide if I even want to render it at the first place, and for that, I'll check if the flash object has either a notice or alert set.
Then just return in case of doing nothing. Maybe even better would be to return an empty string instead of a hash but it doesn't really matter in this case.
hidden = !(flash[:notice] || flash[:alert])
return if hidden

# TODO: resolve variables here
Now we can resolve the actual partial locals. It's nothing fancy, just assign the correct message and the correct class depending on the flash key value present.
module Main
  module Views
    module Helpers
      def flash_message
        flash = _context.flash
        hidden = !(flash[:notice] || flash[:alert])
        return if hidden

        message = flash[:notice] ? flash[:notice] : flash[:alert]

        notification_class = flash[:notice] ? "is-success" : "is-danger"

        render(
          'layouts/flash_msg',
          message: message,
          notification_class: notification_class,
        )
      end
    end
  end
end
Oh, linter is showing me a reminder that I can remove the hash values in Ruby 3 which I still haven't gotten used to yet.
When we check the browser, you'll see that everything works as previously, but our partials are just way more clean and easy to work with, while all the logic becomes easily testable by unit testing our helper.
However, can we get even better?
Get better with scopes
If you check closely, this flash_msg HTML block is just a very general notification, and we could want to reuse it with different notification strings across multiple places in our application. For example, when you subscribe to our newsletter, you may want to get the notification inline, below the subscription form, instead of on top of the page.
Or, your use case may be completely different, where you want to have a separate notification partials for each notifciation type, with some fancy HTML building, but with the same variables required to put that together.
Also, our helper method here gets a bit blown up even with this simple partial resolving, so for more complex logic extraction, it could be hard to maintain in the future.
For such purposes, when you want to have the different partials rendered with multiple contexts, Hanami 2 provides the view scope mechanism.
This is a separate class that it's sole purpose is to accept the contextual locals and resolve all the logic we just did in the helper.
Let me create a new Scope class for our flash messaging system. According to the official recommendation, it's better to use the general slice-specific scope parent class, but for this toutorial, I think we'll be fine if I skip this step.
module Main
  module Views
    module Scopes
      # @usage
      #  scope(Notification).
      #    render('layouts/notification', notification: { alert: 'This is the error'}).
      #
      class Notification < Main::Views::Scope
        def message
          return '' if hidden?

          notification[:notice] ? notification[:notice] : notification[:alert]
        end

        def notification_class
          return 'is-hidden' if hidden?

          notification[:notice] ? "is-success" : "is-danger"
        end

        def hidden?
          !(notification[:notice] || notification[:alert])
        end
      end
    end
  end
end
I'll extract here the locals resolving logic from the helper. I want this to be more general, so I'll replace the flash with the notification.
Then I'll define all the methods needed by our partial, and I can even improve the reliability, to always return a string for the message, as well as adding the is-hiding class for my notification box in case somebody forgets to conditionally render the block.
Now in the flash_message helper, I just want to get the scope and pass the notification to it.
Then return nothing if the scope resolves the notification to a hidden one.
module Main
  module Views
    module Helpers
      def flash_message
        notification_scope = scope(Scopes::Shared::Notification, notification: _context.flash)
        return if notification_scope.hidden?

        notification_scope.render('layouts/flash_msg')
      end
    end
  end
end
Let's do a final check. Everything works just fine! That's amazing!
We now have a general mechanism to resolve any notification in any template or partial in the future, but both the helper and the template is very skinny and easy to understand.
If that's not enough, you can unit-test any part of the logic and leverage the inline documentation strategies to make sure everything is understandable for your team. You may check the episode 17, where I've covered this topic to get more insights about the patterns.
Summary
Thank you for watching, this is all I have prepared for you today. I know this may feel a bit overwhelming for such a simple feature, but I've intentionally used a simple example to explain the concepts well.
Having a scope that resolves variables for different partials can be an amazing improvement for your codebase, and in the next episode, I am going to show you a really advanced example, with scope resolving locals for rendering different form input fields.
It'll be the PRO episode though, so if you want to check it out, feel free to join us by buying a subscription, and join our discord server there for direct contact with me.
I hope you've enjoyed this episode, and if you want to see more content in this fashion, Subscribe to my YT channel, Newsletter and follow me on Twitter!
Thanks:
I want to especially thank my recent sponsors,
and all the Hanami Mastery PRO subscirbers, for supporting this project, I really appreciate it!
Consider sponsoring?
If you want to support us, check out our Github sponsors page or join Hanami Mastery PRO as mentioned just before!
Thank you and have a happy rest of your day!
Add your suggestion to our discussion panel!
I'll gladly cover them in the future episodes! Thank you!