In the previous episode, I showcased the possible implementation of the Sitemap generation for your Hanami applications. If you're new to the channel, make sure you check that out as today I'll make a direct improvement on that topic.
My sitemap generation works great, however, it's not production ready yet, because generating a sitemap can take a while for bigger collections.
It doesn't matter if you want to send an email, upload a file, or perform some expensive calculations, I've always trying to minimize the time my server is blocked by a single request.
In this particular case, I don't want to block my server until the sitemap generation is finished. If I would, my blog authors would be frustrated by waiting for too long after publishing a post!
 Waiting for too long
To achieve this I could make use of multiple threads, or by using ractors, or I could leverage one of the background jobs libraries.
Today I will show you how to make use of a background jobs approach by using a sidekiq gem and configuring it to work with Hanami projects.
Then I'm going to schedule my background job to run every day and refresh my sitemap by updating it with new content from my website without me even thinking about it.
So let's go!
Sidekiq
If you work with ruby, I guess I don't need to introduce a sidekiq gem to you. It's a background processing engine for Ruby.
It's used almost everywhere. For a long time, ruby lacked a robust built-in solution to execute code in parallel so solutions like sidekiq were one of the first things you've added to the applications.
With the introduction of Ractors things may slowly diverse over time, but I don't expect any big shifts in the near future, as people are just comfortable with using background jobs processors at this point.
Sidekiq has built-in rails integration but making it work with any ruby project is pretty straightforward and this is what I will show you today using Hanami as an example.
First, let me add sidekiq to the Gemfile and install it.
# Gemfile
gem "sidekiq", "~> 6.5"
bundle install
With this, I can configure the gem to work with my project.
Sidekiq configuration in Hanami application
Sidekiq configuration is pretty straightforward in Hanami, as well as in any Ruby project. I'll need
- A worker
- ruby file loading code required for my worker to work.
However, before I'll add them, let me briefly explain how the sidekiq works. Nothing detailed, just to give you a rough idea.
Same as with a lot of other stuff, It's not necessary to know it in order to use it. But I used sidekiq for YEARS without really understanding how it works under the hood and at some point I got this question on the recruitment call and felt a bit dumb.
How does sidekiq work?
So here is the thing. I simplified the whole thing extremely, but I can recommend the great article about this topic written by Paweł Dąbrowski. He digs deeply into the sidekiq's implementation and what is happening in each step. Totally recommend that one!
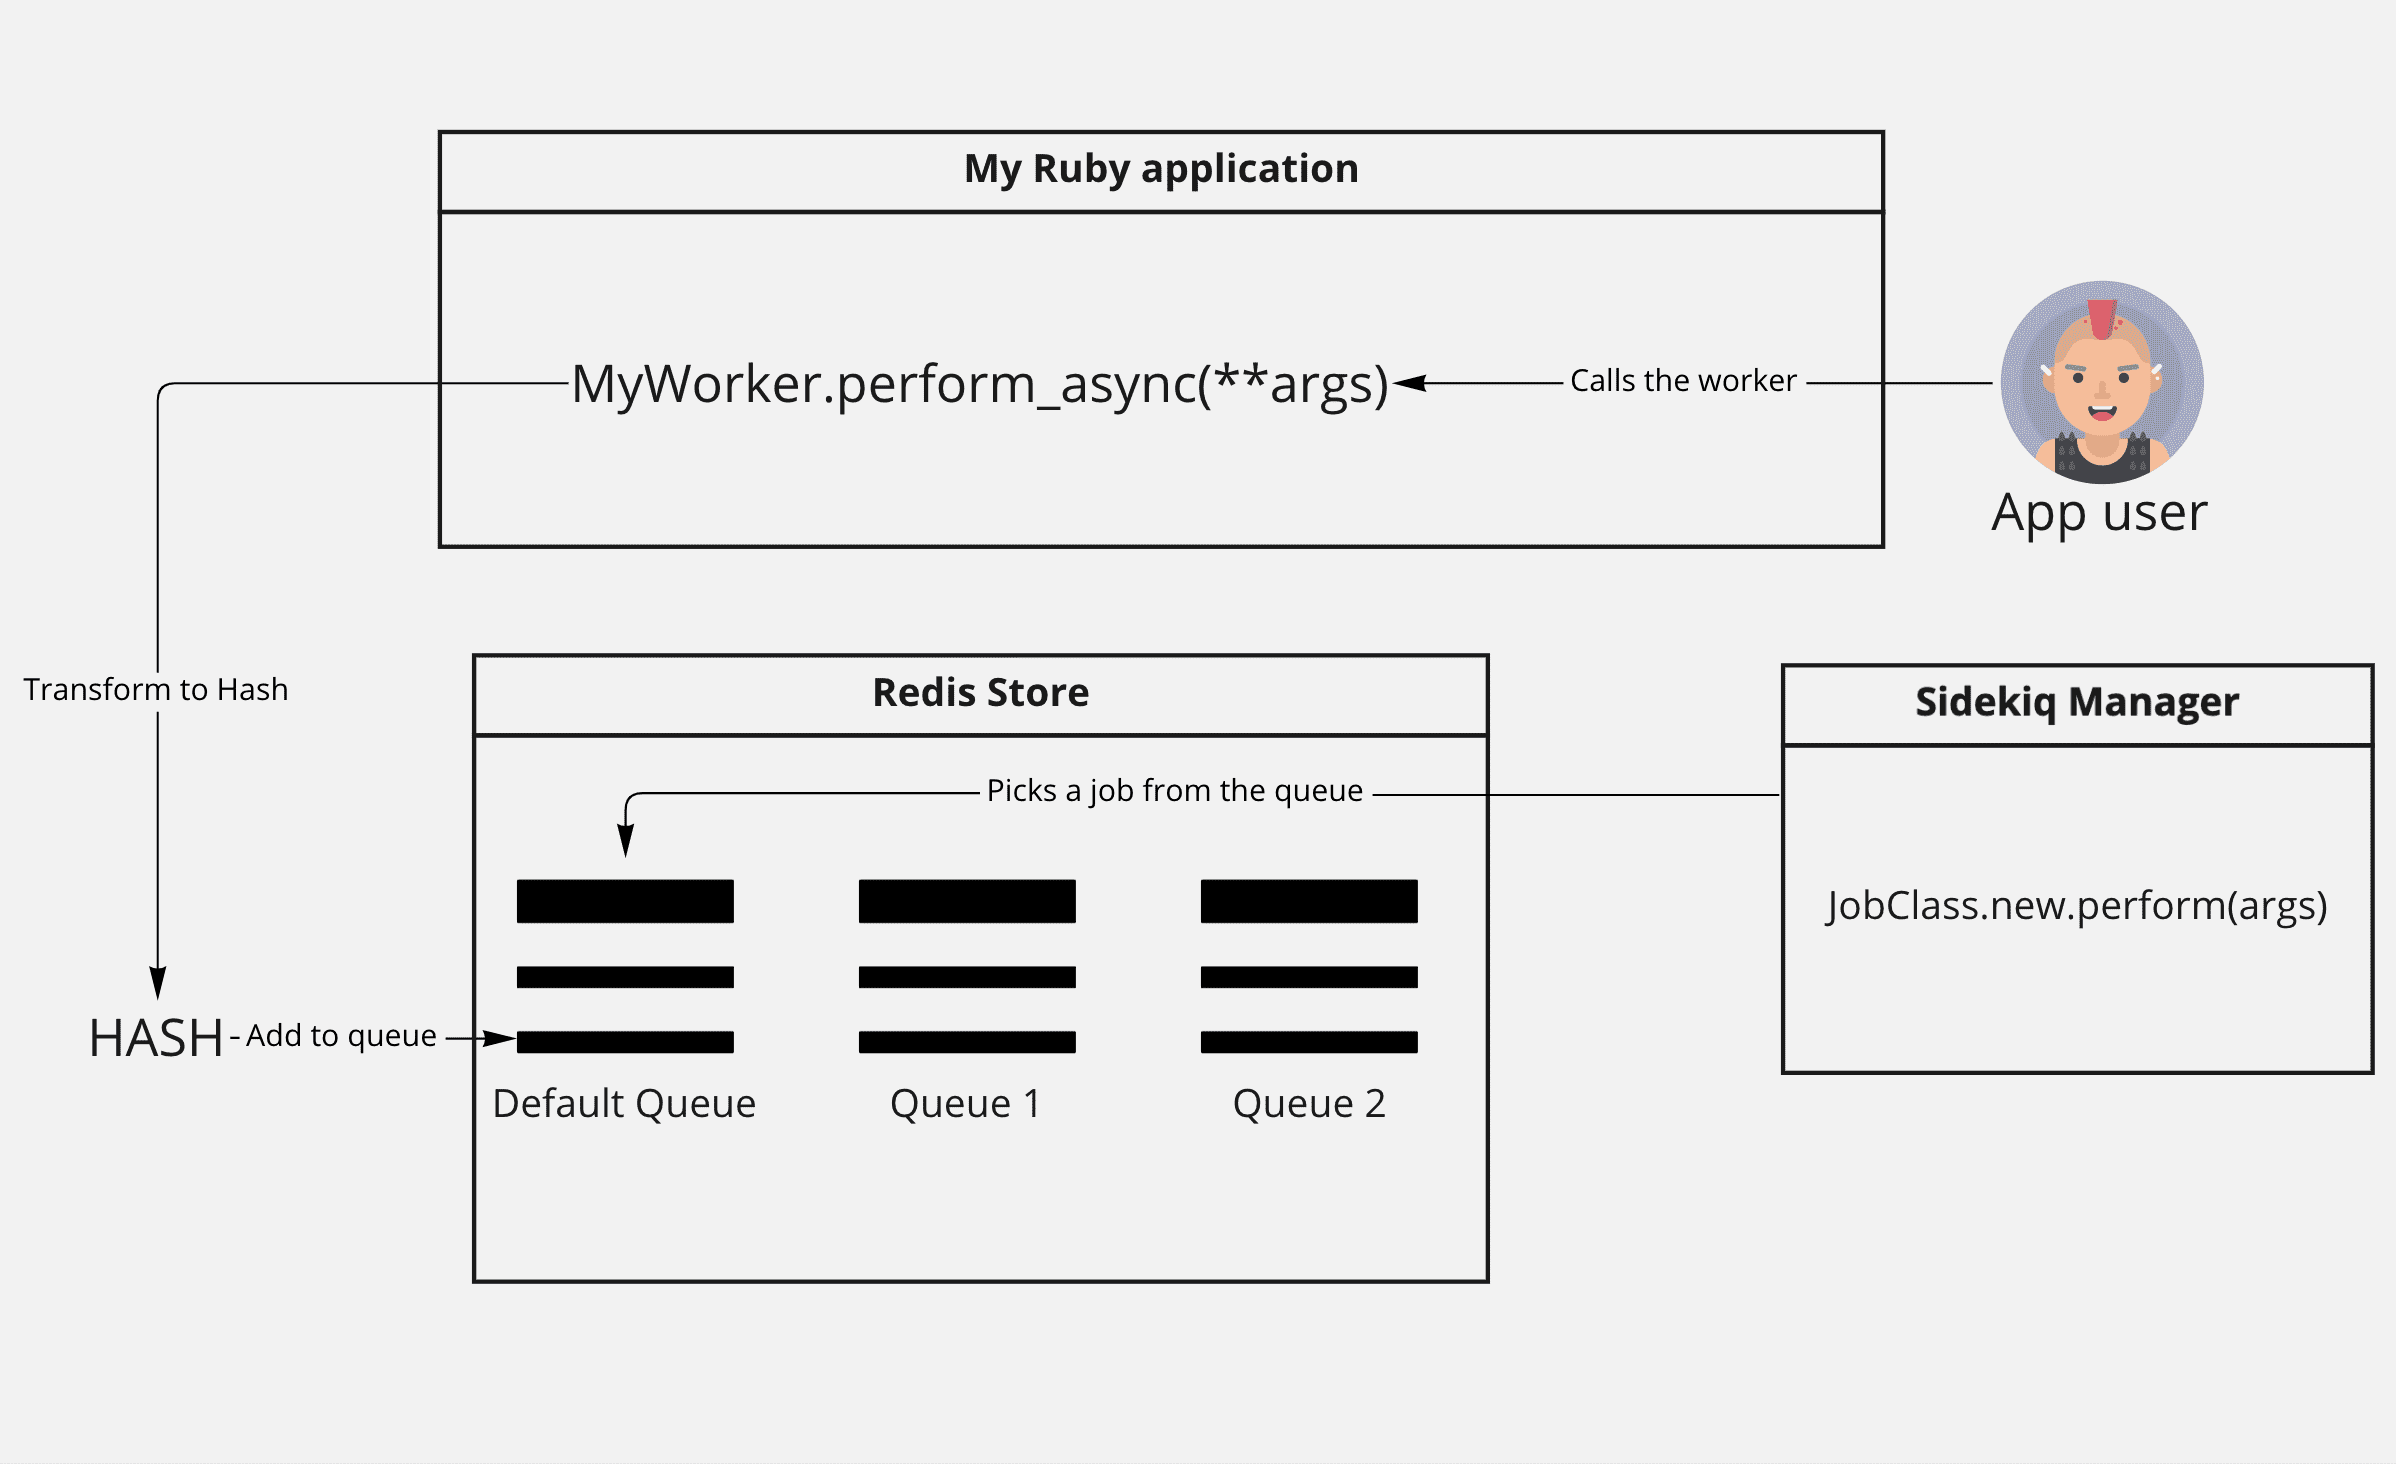
Sidekiq is basically a separate ruby application, that communicates with the Redis database, where it schedules jobs to do later, and picks them up in a separate thread.
 How sidekiq works?
Usually, the setup works like this. You have your application running in a single thread. From this thread, you're running the perform_async method on the worker class, which transforms the Sidekiq definition and the arguments passed to the method, to a hash.
Then this hash is added to the chosen queue in the Redis store.
In a separate thread, container, or whatever, a sidekiq job manager is running, picking up everything that is added to the queue, instantiating the instance from the hash version, and performing the job synchronously.
You may have multiple sidekiq containers picking up the jobs from the queue, because each of them will pick only one job at a time from redis, and that operation is thread-safe.
What you can learn from this diagram though, is that sidekiq manager, doesn't really need to know about your application code, but only about workers, and the code required by those workers to be run.
This is important as in Hanami we really can leverage this thing for our advantage.
Now let me add my worker.
GenerateSitemap worker class
In the previous episode, I've written a generate_sitemap service. Now I'm going to create a new file, in the app/workers directory with the same name. My worker will inject that service as a dependency.
Then within the perform method, I just call my service right away.
# app/workers/generate_sitemap.rb

require 'sidekiq'

module Sandbox
  module Workers
    class GenerateSitemap
      include Sidekiq::Job

      include Deps['interactors.generate_sitemap']

      def perform
        generate_sitemap.call
      end
    end
  end
end
Looks simple, doesn't it? And indeed it is!
Configuring sidekiq process
Now we need the Sidekiq configuration file to be added.
I create a new file in the config directory, named sidekiq.rb, and boot my Hanami application inside.
Because I placed my worker within the app directory, I can just boot my Hanami application, and all my workers will be loaded without me doing anything!
As a bonus, all dependencies will be resolved automatically!
# config/sidekiq.rb

require 'sidekiq'

require 'hanami/boot'
With this, I can run my sidekiq process by pointing to my sidekiq.rb file and checking in the console if everything works well.
bundle exec sidekiq -r ./config/sidekiq.rb
This will do nothing, because I don't have any jobs scheduled in the Redis yet. To fix it, I'll call my worker manually for now, directly from the Hanami Console.
# Hanami console
require 'sidekiq'
Sandbox::Workers::GenerateSitemap.perform_in(0.1)
When I switch to my running sidekiq terminal tab, I can see the sitemap successfully generated!
pid=15509 tid=9f1 class=Sandbox::Workers::GenerateSitemap jid=183f158facbe04065e159af3 elapsed=0.234 INFO: done

pid=15509 tid=9f5 INFO: queueing Sandbox::Workers::GenerateSitemap (generate_sitemap)

pid=15509 tid=9h1 class=Sandbox::Workers::GenerateSitemap jid=16a3ec87b6bbdd97676f365d INFO: start
In '/(...)/public/':

+ sitemap.xml.gz                                           7 links /  369 Bytes
Sitemap stats: 7 links / 1 sitemaps / 0m00s

Pinging with URL 'http://hanamimastery.com/sitemap.xml.gz':
  Successful ping of Google
Awesome! It seems that sidekiq is properly configured already!
This way you could trigger the sitemap generation asynchronously, from the Hanami Action, or the interactor. However, let's do better!
Scheduling recurring jobs
What we already did is great, but I don't want to always trigger sitemap generation manually. Instead, I'd love to have a background job that is automatically triggered every day.
This way I won't need to worry about updating my sitemap, or pinging search engines after a successful sitemap refreshing.
For that, I'll use the sidekiq-scheduler gem. It's quite simple, but an extremely useful library giving our sidekiq some steroids. Let me add it very quickly to my project.
# Gemfile
gem "sidekiq-scheduler"
bundle install
This gem allows me to define a sidekiq.yml file inside of the config directory, where I can have all my recurring jobs defined!
I'm going to schedule my generate_sitemap worker now.
I need to define the identifier of my scheduled position, then specify how often the job should run. Just for this showcase, I'll set it to run every 2 seconds.
Don't you know the cron syntax?
If you are not familiar yet with this scheduling syntax, I recommend you bookmark the Cronatab Guru. It's an interactive editor of the crontab syntax which I visit all the time because cron syntax is one of these things that I am just unable to remember.
# config/sidekiq.yml

:schedule:
  generate_sitemap:
    cron: '*/2 * * * * *'   # Runs once per minute
    class: Sandbox::Workers::GenerateSitemap
With this, I can just change my sidekiq configuration file to require the sidekiq scheduler, and I'm ready to go.
# config/sidekiq.rb

require 'sidekiq-scheduler'

require 'hanami/boot'
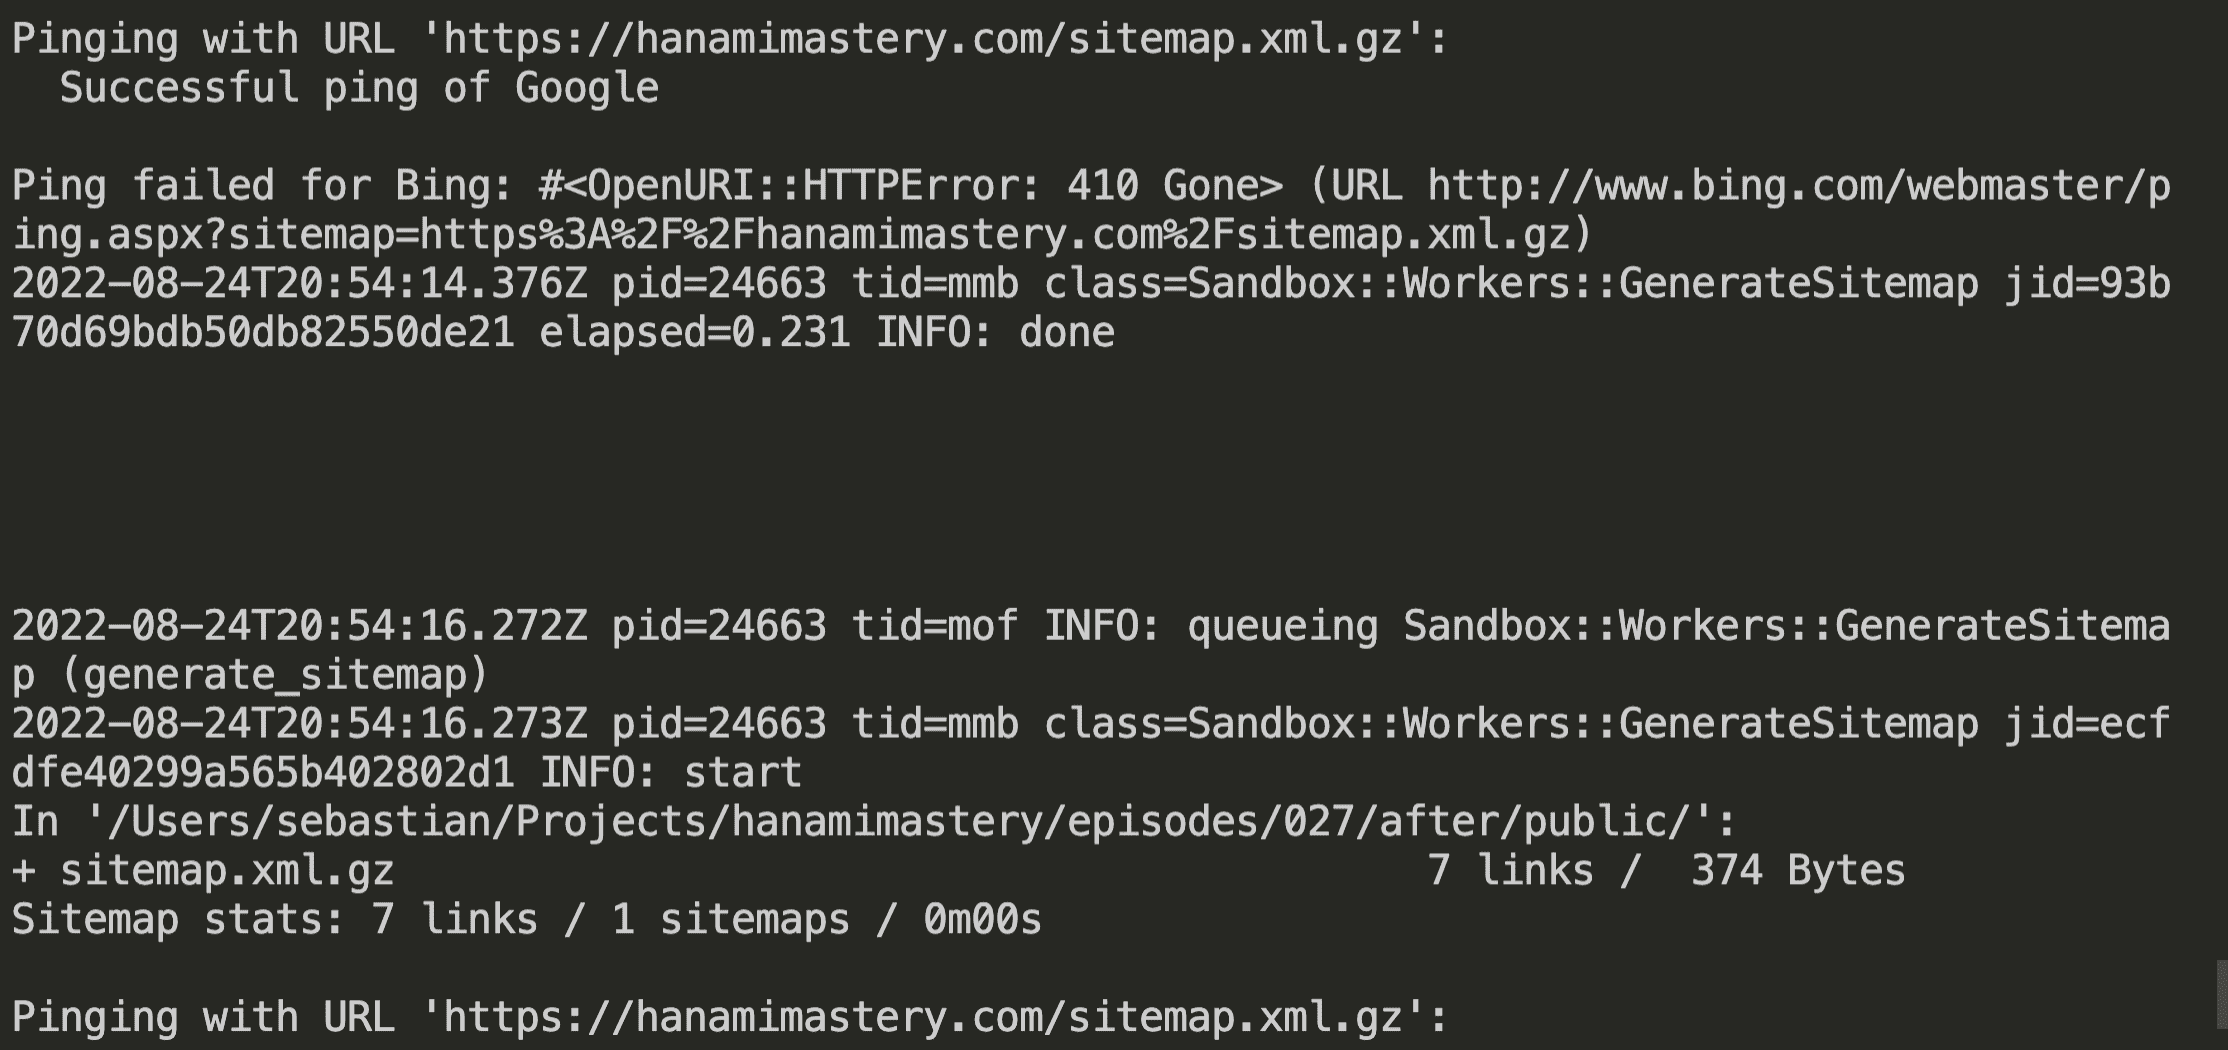
Now, when I run the sidekiq process again and wait a few seconds, you'll see the sitemap regeneration logs being shown on the console every two seconds.
 Logs from repeating workers run
Now I can set the schedule to run at midnight every night, and we're ready to go!
# config/sidekiq.yml

:schedule:
  generate_sitemap:
    cron: '0 0 0 * * *'   # Runs once per minute
    class: Sandbox::Workers::GenerateSitemap
Summary
Sidekiq scheduling is amazingly simple to setup as you had seen in this example. However, by putting the workers into the app directory, we reflected the Rails setup, where sidekiq by default needs to load our whole application.
If we want to be more explicit, we could keep our workers within the lib folder, and only load whatever is necessary for them to run, however, I like to leverage the slices to group my workers logically to the part of the application they belong.
Let me know in the comments, if you would like to place your workers in different places, and why!
Unfortunately, that's all I have prepared for this episode, I hope you've found it useful and if you do, consider subscribing to the channel and follow me on Twitter!
Become an awesome subscriber!
If you want to see more content in this fashion, Subscribe to my YT channel, Newsletter and follow me on Twitter!
Thanks
Recent sponsors
Other thanks
- Erik Mclean - for the great Cover Image!
If you have found this content useful, I'll appreciate it if you consider supporting this initiative.
See you soon!
Add your suggestion to our discussion panel!
I'll gladly cover them in the future episodes! Thank you!

